Recipe Development
Recipes allow you to extend Ellf with any custom workflows and functionality – from your own annotation logic to model training, data analysis, deployment and more. Recipes are Python functions defining task, action, agent or service workflows, and can access any assets, including input data and models. They run entirely on your own private cluster. (If you’ve used Prodigy before, you might already be familiar with the concept of recipes – Ellf’s version of them is very similar.)
Use Ellf to develop recipes for you
This page explains how to develop and implement recipes from scratch and documents the CLI usage and developer API. If you’ve connected Ellf to your coding assistant, it will become proficient at recipe development as well and can take over the implementation for you.
Setup and installation
For developing custom recipes, Ellf provides a developer SDK package that includes all required Python utilities, as well as the ellf-dev command-line interface to preview and run recipes before you upload them to the cluster. Before you start, also make sure you have Prodigy installed in your environment.
$pip installellf-recipes-sdk
ellf-recipes
To make it easy to get started, the CLI provides a recipes init command that generates the directory structure of a new recipes package and includes all required files, as well as an example recipe template you can edit:
UI Forms and CLI generation
Ellf lets you create new tasks, actions, agents and services from recipes via the web application and the command-line interface. The UI and CLI are generated automatically behind the scenes, based on the settings provided by your recipe. This essentially means that you can script the SaaS application in Python – using code that runs and stays entirely on your private cluster.

Previewing recipe forms
The ellf-dev preview command is a handy utility for developing recipes. It serves a local preview of the UI form generated for the given recipe code. This makes it easy to try out different options and arguments. To start, you can preview the example task included in the recipe package generated by ellf recipes init. By default, this command will serve the UI form preview on localhost:9090:
$ellf-devpreviewexample_task./recipes/my_first_recipe/recipes/example_task.pyStarting the preview server...
SCHEMA   http://localhost:9090/schema
PREVIEW  http://localhost:9090
As you make changes to the file example_task.py, the preview live-reloads so you can see how your changes affect the generated form fields. Note that since the preview runs outside of the Ellf context and isn’t connected to any cluster, it comes with some limitations and includes dummy data for datasets and assets and only performs superficial data validation.
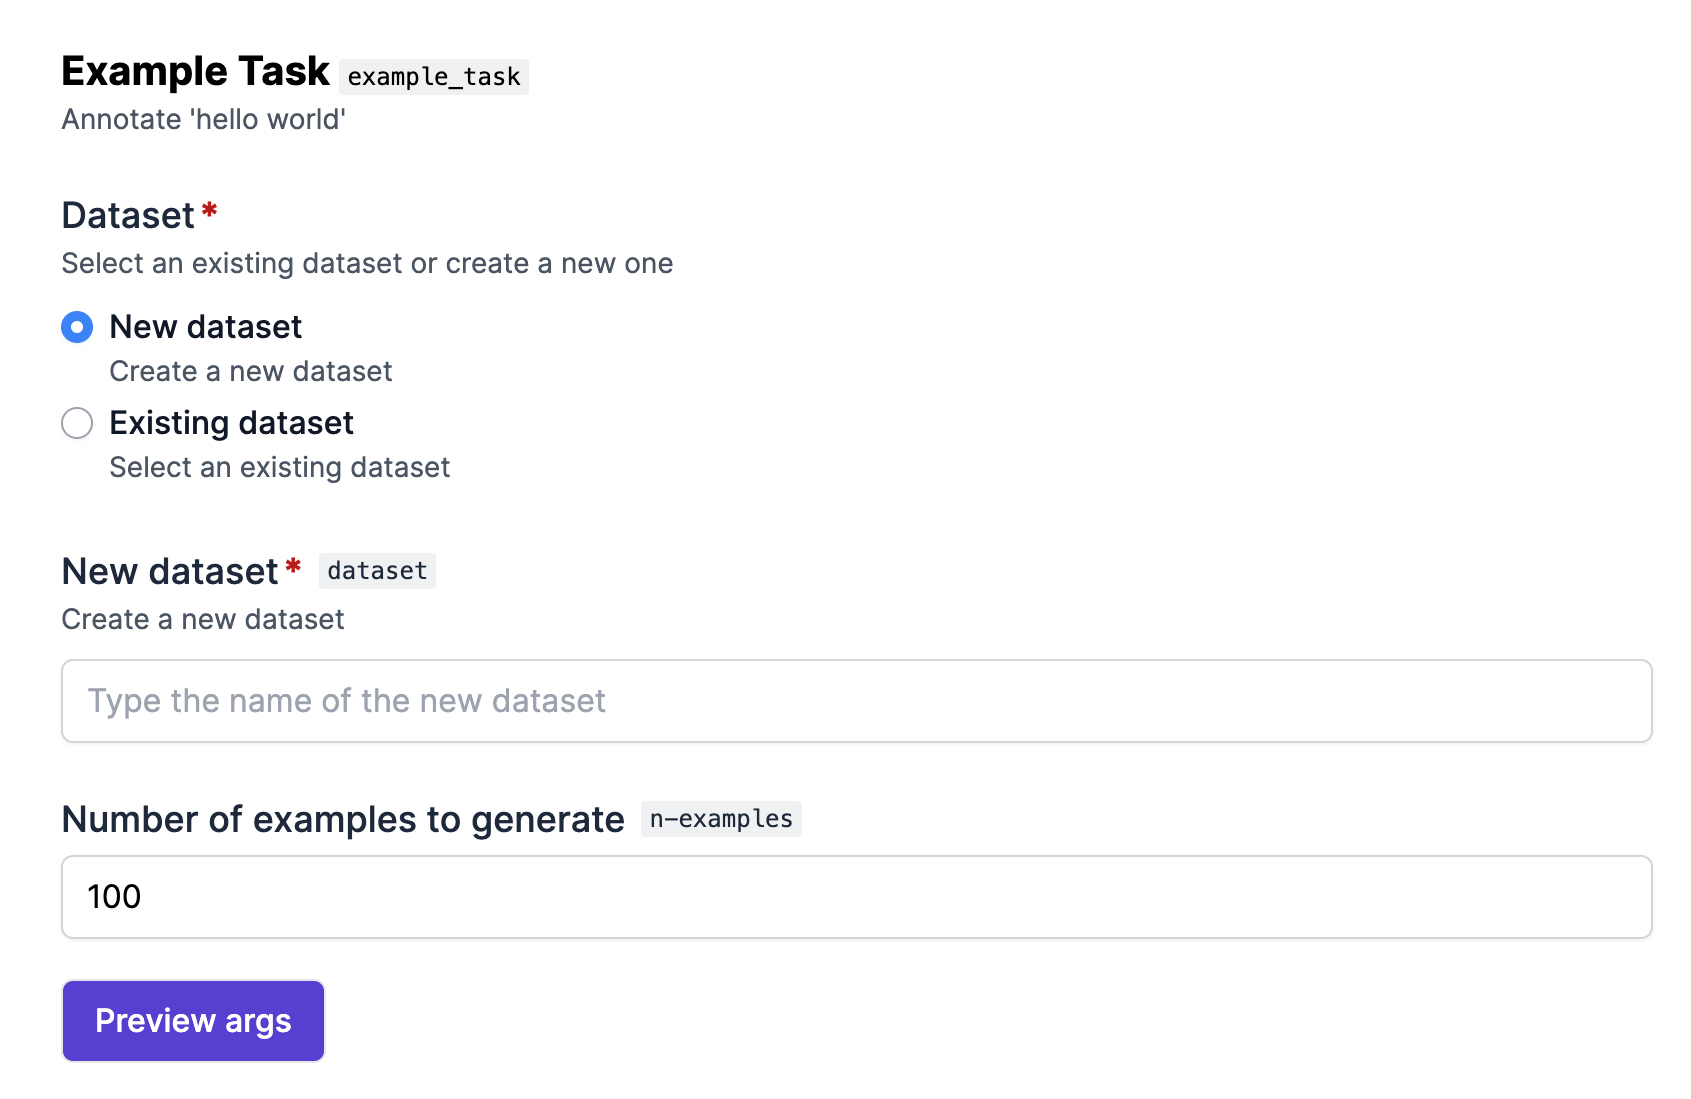
The Preview args button will show you a JSON representation of the output that will be generated for the form field values you’ve filled in, which can sometimes be helpful for testing and debugging. At runtime, this is the data that will then be converted into recipe arguments.
Configuring form fields
Looking at example_task.py, you’ll see the @task_recipe decorator describing the recipe function and its title and description. The recipe decorator also includes a field_props argument that corresponds to the arguments of the function. These are the props, or “properties”, describing metadata for the form fields rendered in the UI, and the arguments generated for the CLI.
@task_recipe(
    title="Example Task",
    description="Annotate 'hello world'",
    field_props={
        "dataset": props.dataset_choice,
        "n_examples": IntProps(title="Number of examples to generate", min=1),
    },
)
def example_task(
    *, dataset: Dataset[Literal["text"]], n_examples: int = 100
) -> RecipeSettingsType:
...The way the argument fields are presented depends on two things:
- The props in
field_props: This is where you define field-specific meta data like the title, help text, or placeholder, constraints for the native browser input validation and respective error messages and warnings, and optionally the UI widget to use for fields that can be presented in different ways, like a dropdown or list of radio buttons. - The type hint assigned to the function argument: This defines the type of the expected setting and and influences which field is chosen. For example, string inputs will become text input fields, fields of type
Assetwill become fields that let you select an available asset on the cluster, and fields marked asOptionalwill show a checkbox that only reveals the optional settings when checked.
Form field props API
Defining validations
Validations can be added to props and let you express custom logic for validating the input provided to the web form. They let you go beyond the simpler pattern or min/max values on props and define one or more conditions for custom errors, but also warnings and info shown to the user while filling in the form. An error will prevent the form from being submitted, while all other validation types simply show a message. Validations can be very helpful to enforce consistency and best practices across your team.
from ellf_recipes_sdk import Validation

validations = [
    Validation(
        op="lt",
        value=1,
        message="You need to generate at least one example.",
        level="error",
    ),
    Validation(
        op="ge",
        value=1000,
        message="Are you sure you want to generate this many examples?",
        level="warning",
    )
]
Validations can define an operator, a value to compare against, a custom message and a level, either "error" (prevents form from being submitted), "warning", "info" or "success". Depending on the type of the field, operators are interpreted as follows:
| Operator | Description | Text | Number | List |
|---|---|---|---|---|
ge | greater or equals >= | - | value | number of items |
gt | greater than > | - | value | number of items |
le | lower or equal <= | - | value | number of items |
lt | lower than < | - | value | number of items |
eq | equal == | value | value | number of items |
ne | not equal != | value | value | number of items |
re | regular expression | value | - | - |
For numeric fields and list fields (compared by number of items), all comparison operators are available. For text fields, only eq, ne and re (regular expression) are supported.
The validations setting on all props takes a list of one or more Validation objects:
field_props={
    "dataset": props.dataset_choice,
    "n_examples": IntProps(title="Number of examples to generate", validations=validations),
}
Note on validations in the form preview
Because the previews generated with ellf-dev preview run outside the context of the Ellf application, they currently only perform superficial validation and simply show you the message if the validation condition matches. You’ll always be able to submit the form in the preview to preview the arguments, which is useful for debugging purposes.
Optional fields
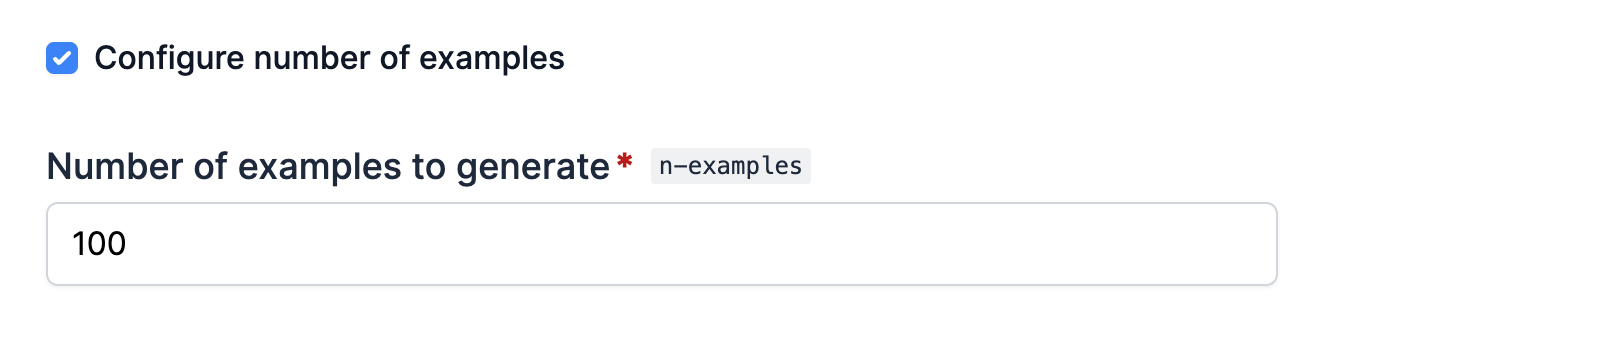
Recipes often include settings that are optional and don’t have to be set to run it. On a command-line interface or in Python itself, this is pretty straightforward: you simply don’t provide that argument. In the web application, optional fields are available behind a checkbox that the user can toggle.
You can create an optional field by marking the argument as Optional in the function. The optional_title available via the props lets you customize the message that’s shown alongside the checkbox that toggles the optional field(s).
from typing import Optional

@task_recipe(
    title="Example Task",
    description="Annotate 'hello world'",
    field_props={
        "dataset": props.dataset_choice,
        "n_examples": IntProps(
            title="Number of examples to generate",
            min=1,
            optional_title="Configure number of examples"
        ),
    },
)
def example_task(
    *, n_examples: Optional[int] = 100, dataset: Dataset[Literal["text"]]
) -> RecipeSettingsType:
    ...
Union fields
Union fields let you handle arguments that can be of two or more different types – for example, an Input asset or an InputDataset, or two different sets of configuration options for different modes. This allows you to have a single recipe covering a variety of different use cases, depending on how it’s configured.
In the example task, we can add another argument text for the text to generate that can either be a string, or a list of strings to randomly choose from. The ChoiceProps let you define props for the individual choice fields as choices, to customize the text displayed for the two options. The name of a choice field is the name of its parent argument with the suffix of its type, e.g. "text-str" for the string option and "text-list" for the list option.
import random
from typing import Union, List, Literal
from ellf_recipes_sdk import task_recipe, IntProps, ChoiceProps, TextProps, ListProps, props

@task_recipe(
    title="Example Task",
    description="Annotate 'hello world'",
    field_props={
        "dataset": props.dataset_choice,
        "n_examples": IntProps(title="Number of examples to generate", min=1),
        "text": ChoiceProps(
            title="Text to use",
            choice={
                "text-str": TextProps(title="Single text"),
                "text-list": ListProps(title="Texts to randomly choose from"),
            },
        ),
    },
)
def example_task(
    *,
    text: Union[str, List[str]],
    dataset: Dataset[Literal["text"]],
    n_examples: int = 100,
):
    example_text = text if isinstance(text, str) else random.choice(text)
    stream = ({"text": f"{example_text} {i}"} for i in range(n_examples))
    ...
Creating custom types
Custom types are an incredibly powerful feature that let you define your own dataclasses of settings. They can be used to group specific settings together and share them across your recipes, and you can combine them with optional or union types to implement custom logic flows in your recipe.
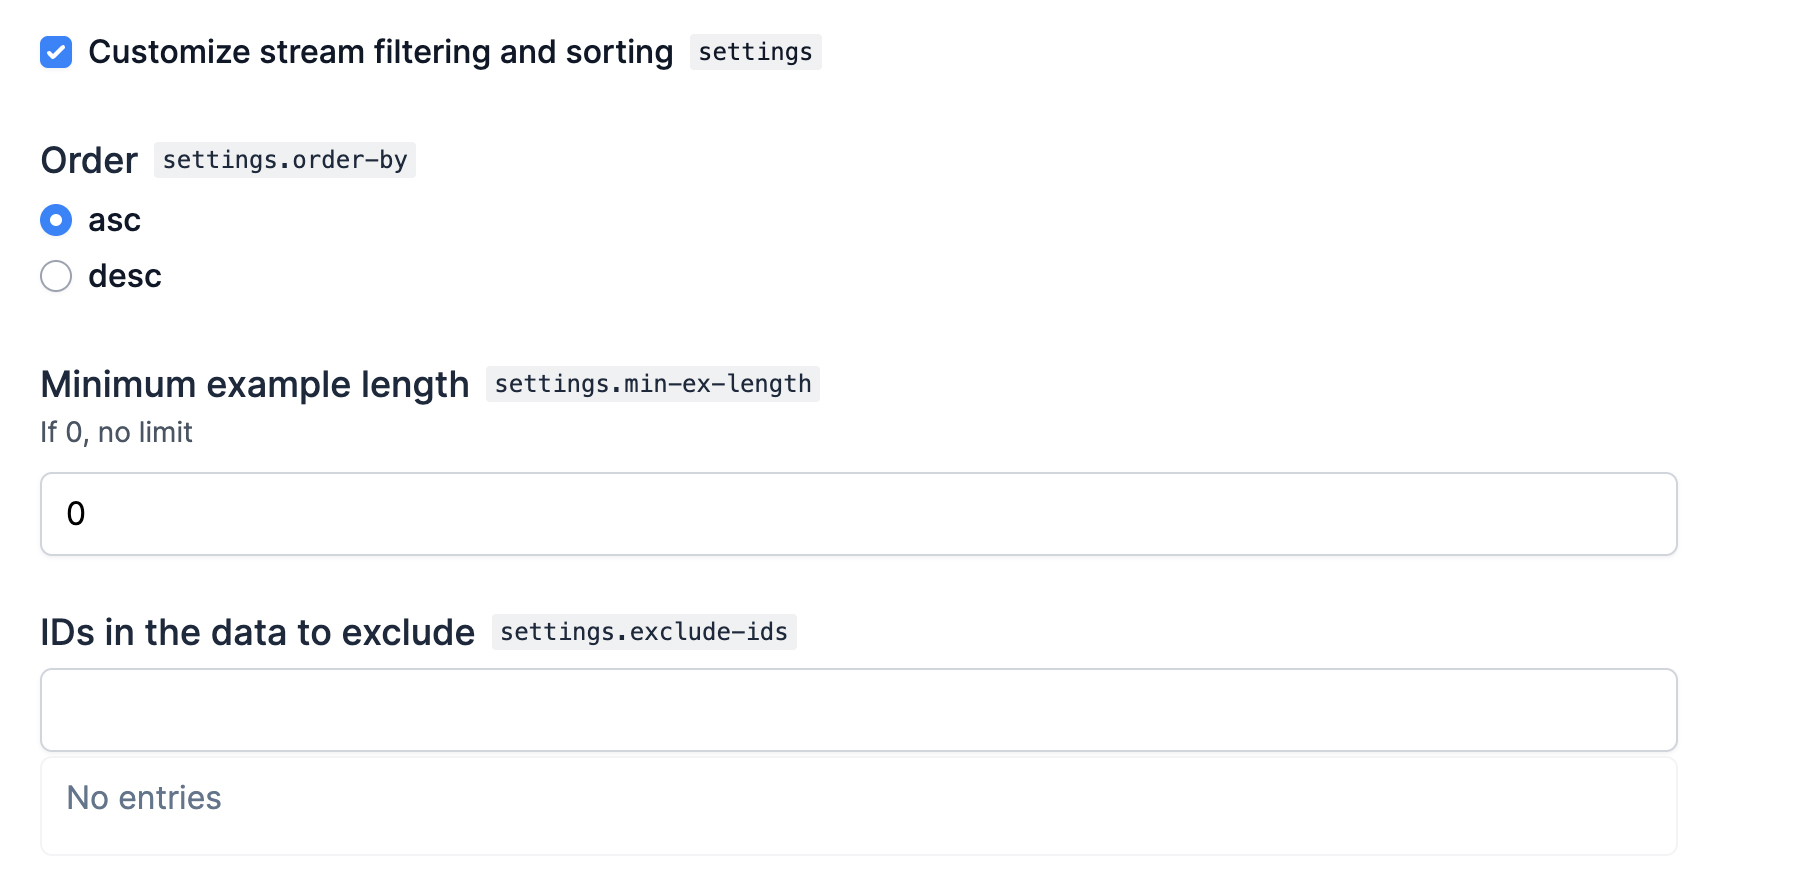
The @ellf_type decorator lets you turn a dataclass into a custom type. Like the recipe decorator, it also has a field_props argument that lets you provide props for the fields included in the dataclass. This example shows a custom type combining various settings for applying custom sorting and filtering to a stream of data:
from typing import Literal, Iterable
from dataclasses import dataclass
from ellf_recipes_sdk import ellf_type, Props, ChoiceProps, IntProps, ListProps

@ellf_type(
    title="Customize the stream",
    field_props={
        "order_by": ChoiceProps(title="Order", choice={"asc": Props(title="Ascending"), "desc": Props(title="Descending")}),
        "min_ex_length": IntProps(title="Minimum example length", description="If 0, no limit"),
        "exclude_ids": ListProps(title="IDs in the data to exclude"),
    }
)
@dataclass
class StreamFilter:
    order_by: Literal["asc", "desc"] = "asc"
    min_ex_length: int = 0
exclude_ids: Iterable[str] = tuple()Using the dataclass decorator
While it’s not strictly required, the @ellf_type decorator should always be used together and on top of the @dataclass decorator to improve type checking support in your editor and static type checker.
In your recipe, you can now use the custom type as the type hint of the function, and even combine it with Optional to only reveal the settings if the user wants to customize them. All props defined in the @ellf_type decorator will be merged in automatically, and you can override settings if needed, for instance to add the optional_title.
from typing import Optional
from ellf_recipes_sdk import action_recipe, Props

@action_recipe(
    title="Example Action",
    field_props={
        "settings": Props(optional_title="Customize stream filtering and sorting"),
    },
)
def example_action(settings: Optional[StreamFilter] = None):
    if settings:
        ...
When using a custom type as the type hint in your recipe, the recipe will receive an instance of the custom type with the respective settings filled in. This means that custom types can also implement methods that can be called from the recipe. This lets you build very elegant solutions, because it means your recipe only has to call the custom type methods and doesn’t need to repeat all the individual settings and respective logic.
from typing import Iterator

@ellf_type(...)
@dataclass
class StreamFilter:
    order_by: Literal["asc", "desc"] = "asc"
    min_ex_length: int = 0
    exclude_ids: List[str] = []

    def filter_stream(self, stream: Iterator[dict]) -> Iterator[dict]:
        # Apply filtering and sorting using the above settings
...from ellf_recipes_sdk import Input
@action_recipe(...)
def example_action(stream: Input, settings: Optional[StreamFilter] = None):
stream = input.load()
if settings:
stream = settings.filter_stream(stream)Specifying asset and dataset constraints with kinds
Recipes often require specific types of data – for example, a recipe working with text needs text input, an image-based recipes images, and so on. When creating datasets or data assets, you can specify their kind – an arbitrary string describing the type of the data. For example, "text" or "image". In a recipe, you can then restrict the assets or datasets available to only those of a given kind.
The built-in Dataset, InputDataset and Input dataclasses are generic types, which basically means that they can take an “argument”. This is a Literal string of the kind. For instance, the example recipe, which generates text, defines that the new or existing dataset should be of kind "text":
def example_task(
    *, dataset: Dataset[Literal["text"]], n_examples: int = 100
):
    ...
You can also use the same logic for assets, for example, to ensure that a recipe creates a dataset of kind "image" and only accepts input data of the same kind. In the UI form, the available datasets and assets will then be filtered by kind so you’ll only be able to select resources that match what the recipe requires.
def image_recipe(
    *,
    dataset: Dataset[Literal["image"]],
    input_data: Asset[Literal["image"]]
):
    ...
Configuring the recipe CLI
In addition to the UI forms, Ellf also generates a command-line interface for each recipe. It uses the same metadata provided for the UI via the field_props, so no additional configuration is required. To view a recipe CLI and its available arguments and documentation, you can run tasks create, actions create, agents create or services create with the name of the recipe and --help:
Customizing CLI names and arguments
When working with union types, there are many different options and sub-settings an argument can have. If one option of the union is selected, different sub-settings might be available or required. By default, Ellf will generate distinctive CLI argument names for each union member, to keep the arguments separate and prevent clashes. However, in some cases, this can lead to unnecessarily long argument names, e.g. --model-blank.lang for the BlankModel.lang sub-setting.
If you know that your arguments don’t clash, you can use the cli_names argument of the recipe decorator to map the long names to shorter versions that are easier to type. For example, this means that --model-blank.lang can become --model.lang.
from typing import Union
from ellf_recipes_sdk import task_recipe, Props, BlankModel, UseModel

@task_recipe(
    title="My Recipe",
    field_props={"model": Props(title="Model")},
    cli_names={
        "model-blank.lang": "model.lang",
        "model-blank.highlight-chars": "model.highlight-chars",
        "model-use.name": "model.name",
        "model-use.update": "model.update",
    },
)
def recipe(model: Union[BlankModel, UseModel]):
    ...
CLI naming best practices
While you can technically rewrite arguments to anything, it’s recommended to still follow the same structure of nested field names generated out-of-the-box. This makes it easier to remember the arguments when using the CLI, and keeps your recipe API consistent.
Writing your recipe code
Use Ellf to implement recipe code for you
If you’ve connected Ellf to your coding assistant, it will become proficient at recipe development and will know the SDK and Python API. It can take over the implementation for you, review your code or help you port over your own custom Prodigy recipes for you.
Task recipes
Task recipes that start the annotation server are identical to Prodigy recipes, aside from differences to the decorator and data loading. They use the @task_recipe decorator and return a dictionary of components, including the annotation UI to use, the stream of examples, various callbacks, settings for task routing, UI customizations and more.
from typing import Literal
from ellf_recipes_sdk import task_recipe, props, TextProps, Dataset, Input

@task_recipe(
    title="My Recipe",
    description="This is a task recipe",
    field_props={
        "dataset": props.dataset_choice,
        "input": TextProps(title="Input data")
    },
)
def recipe(*, dataset: Dataset[Literal["text"]], input: Input):
    stream = input.load()
    return {
        "dataset": dataset.name,
        "stream": stream,
        "view_id": "text",
    }
Because the Prodigy annotation UI and recipe is served directly from your cluster and under your control, you can also customize it with HTML, CSS and JavaScript just like you can when running Prodigy locally. You can include the code in your recipe, or upload your scripts as a custom asset.
Action recipes
Action recipes don’t need to return anything and will perform any custom Python logic and exit. They use the @action_recipe decorator and their output will be stored in the logs, which you can access via the Logs tab or actions logs. Actions will typically take resources from the cluster, e.g. datasets, assets or models, as arguments and common use cases are model training, data processing and analysis.
from ellf_recipes_sdk import action_recipe, TextProps, BoolProps, Input

@action_recipe(
    title="My Recipe",
    description="This is an action recipe",
    field_props={
        "input": TextProps(title="Input data"),
        "verbose": BoolProps(title="Print examples")
    },
)
def recipe(*, input: Input, verbose: bool = False):
    stream = list(input.load())
    print("Examples count:", len(stream))
    if verbose:
        print(stream)
Agent recipes
Agent recipes define the logic used by the autonomous agent and annotator. They use the @agent_recipe decorator return an Annotator callable – a function that takes a task dictionary and a config dictionary and returns an annotated task. The SDK handles the rest: discovering task servers, polling for new tasks, calling your annotator, and submitting the answers. This means your recipe only needs to set up whatever resources it needs (e.g. an LLM client or a spaCy model) and return the annotation function.
from ellf_recipes_sdk import agent_recipe, Annotator, FloatProps, Secret
from ellf_recipes_sdk import detect_task_type, format_prompt, parse_response

@agent_recipe(
    title="My Annotation Agent",
    description="Annotates tasks using an LLM",
    field_props={
        "poll_interval": FloatProps(title="Poll interval (seconds)", min=0.1),
    },
)
def my_agent(*, api_key: Secret, poll_interval: float = 1.0) -> Annotator:
    key = api_key.value()
    client = MyLLMClient(api_key=key)

    async def annotate(task: dict, config: dict) -> dict:
        task_type = detect_task_type(task)
        prompt = format_prompt(task, task_type, config)
        raw = await client.ask(prompt)
        return parse_response(raw, task, task_type, model_name="my-model")

    return annotate
The poll_interval and idle_shutdown_seconds parameters are picked up automatically by the SDK when present in the recipe function signature – you don’t need to handle them yourself. For API keys used to authenticate with LLM providers, you can use Ellf’s built-in secrets feature and API.
Service recipes
Coming soon: This section is still under construction.
Creating assets within a recipe
Recipes can use assets as input data, but also create and update assets, which is especially useful for action recipes. For instance, you can add custom recipes that implement preprocessing, conversion or cleaning logic for specific file formats you’re working with, or use Ellf to import data from a remote database or scrape web content you need. You can then run the action whenever new data is available, publish a new version of an asset in Ellf and make it available to annotation tasks or training actions.
The Input type and all other subclasses of Asset expose a classmethod create, which creates a new record for an asset of the given kind in Ellf. Note that in this example, we’re calling the load method of an asset instance to load the data, and the classmethod of the type to create a new input asset.
from cloudpathlib import AnyPath
import srsly
from ellf_recipes_sdk import action_recipe, Input, TextProps

@action_recipe(
    title="Preprocess data",
    field_props={
        "input": TextProps(title="Raw data to preprocess"),
        "output": TextProps(title="Name of asset to create")
    },
)
def preprocess(input: Input, output: str):
    data = input.load()
    # Your preprocessing logic
    result = [{**eg, "text": eg["text"].upper()} for eg in data]

    # Write the files to your cluster's storage bucket
    path = f"{{__bucket__}}/preprocessed/{output}.jsonl"
    dest = AnyPath(path)
    dest.parent.mkdir(parents=True, exist_ok=True)
    srsly.write_jsonl(dest, result)

    # Create a record of the asset in Ellf
    Input.create(name=output, path=path, version="1.0.0", loader="jsonl")
Importing data from an internal or external resource
Another great use case for actions is loading data from an internal or external resource, like a content management system or your internal database, and creating assets that can then be queued up for annotation or processed further. Once you’ve implemented the action recipe, anyone on your team can then run it in a single click or command. If your data source requires authentication, you can use the built-in secrets feature to securely make your API keys or credentials available to the recipe.
In this example, we’ll be using the Cat Facts API to fetch a list of facts about cats and save them to an input asset in Prodigy’s JSON format, so it can be used by text-based annotation recipes like Named Entity Recognition or Text Classification. The import recipe takes an argument name, which is the name of the asset to create.
from cloudpathlib import AnyPath
import httpx
import srsly
from ellf_recipes_sdk import action_recipe, TextProps, Input

@action_recipe(
    title="Import data from API",
    field_props={
        "name": TextProps(title="Name of asset to create"),
    },
)
def import_data(name: str):
    r = httpx.get("https://catfact.ninja/facts")
    res = r.json()
    examples = [{"text": fact["fact"]} for fact in res["data"]]

    # Write the files to your cluster's storage bucket
    path = f"{{__bucket__}}/imports/{name}.jsonl"
    dest = AnyPath(path)
    dest.parent.mkdir(parents=True, exist_ok=True)
    srsly.write_jsonl(dest, examples)

    # Create a record of the asset in Ellf
    Input.create(name=name, path=path, version="1.0.0", loader="jsonl")
Instead of creating a new asset every time, you can also create a new version of an already existing asset instead, or add the option to either create a new asset or update an existing asset, based on the user’s selection. This makes your recipe more reusable for different scenarios. If the recipe receives an instance of an existing asset, the update method lets you update the record in Ellf. By default, the asset version is incremented as a patch version, e.g. 1.2.3 becomes 1.2.4.
from typing import Union
from cloudpathlib import AnyPath
from ellf_recipes_sdk import action_recipe, TextProps, ChoiceProps, Input
import httpx
import srsly

@action_recipe(
    title="Import data from API",
    field_props={
        "asset": ChoiceProps(
            title="Asset to add data to",
            choice={
                "asset-str": TextProps(title="Name of new asset"),
                "asset-input": TextProps(title="Add to existing asset"),
            }
        ),
    },
)
def import_data(asset: Union[str, Input]):
    r = httpx.get("https://catfact.ninja/facts")
    res = r.json()
    examples = [{"text": fact["fact"]} for fact in res["data"]]
    path = f"{{__bucket__}}/imports/{asset if isinstance(asset, str) else asset.name}.jsonl"
    dest = AnyPath(path)
    dest.parent.mkdir(parents=True, exist_ok=True)
    srsly.write_jsonl(dest, examples)
    if isinstance(asset, Input):  # update existing asset
        asset.update(path=path)
    else:  # create a new asset
        Input.create(name=asset, path=path, version="1.0.0", loader="jsonl")
Running and testing a recipe locally
When you’re happy with your recipe code and the web forms it generates, you can install and run it locally to test it. The directory generated by recipes init is a Python package that you can install in editable mode, which means any changes you make to the files will be reflected in the installed package.
$pip install-e
./recipes
To make sure it worked, you can now run ellf-dev run with the recipe name and --help, which will show the command usage, available arguments and auto-generated CLI docs based on the recipe decorator props and function arguments.
$ellf-devrunexample_task--helpusage: ellf-dev run example_task [-h] --dataset DATASET [--n-examples N-EXAMPLES]

Example Task: Annotate 'hello world'

options:
  -h, --help               show this help message and exit
  --dataset DATASET        Dataset: Select an existing dataset or create a new one (str)
  --n-examples N-EXAMPLES  Number of examples to generate (int) (default: 100)
Mocking Ellf assets and datasets
Since you’re running the recipe locally, it doesn’t have access to any datasets or assets defined on your cluster, so you need to tell it how to resolve the references to assets and datasets locally. You can either use dummy data locally if you just want to test the overall functionality of the recipe, or provide the actual files for a more realistic testing experience.
The ellf-dev CLI provides two commands for this: use create-object to create a mock asset or dataset record in a local JSON file, and import-objects to load them before running the recipe. This lets you point asset paths to local files.
from uuid import UUID
from ellf_recipes_sdk import Input

# You can construct asset instances directly with local file paths
input_data = Input(
    id=UUID("00000000-0000-0000-0000-000000000000"),
    broker_id=UUID("00000000-0000-0000-0000-000000000000"),
    name="test-data",
    version="0.0.1",
    path="./test_data/examples.jsonl",
    meta={"loader": "jsonl"},
)
stream = input_data.load() # loads from the local path{
"test_data": {
"id": "00000000-0000-0000-0000-000000000000",
"broker_id": "00000000-0000-0000-0000-000000000000",
"name": "test-data",
"version": "0.0.1",
"path": "./test_data/examples.jsonl",
"meta": {"loader": "jsonl"}
}
}Starting the recipe
You can now use ellf-dev run to run your recipe locally with arguments, which will start the Prodigy annotation server on the given host and port. Opening the app in your browser will show the annotation UI created by the recipe.
$ellf-devrunexample_task
--dataset test_dataset
--n-examples 10
✨ Starting the web server at http://localhost:9090 ...
Open the app in your browser and start annotating!
Publishing recipes to the cluster
Once you’ve tested your recipes with ellf-dev preview and ellf-dev run and are happy with the results, you can publish it to the cluster so it can be used in Ellf. The ellf publish code command lets you publish local code to the cluster. It takes care of building a Python package and a container image with all required dependencies, so the cluster can run it.
After publishing, the recipe will appear in ClusterRecipes in the UI and you can start creating tasks, actions or agents from it.
Handling package requirements and dependencies
Recipes are Python code, so they can depend on other packages and libraries from the ecosystem or your own private packages, and require specific versions of them. When you publish a recipe, a container image is built with the recipe package and all required dependencies installed. This also means that different recipes can use different versions of the same package dependencies. ellf-recipes-sdk and prodigy will always be added automatically.
The --requirements setting on publish code lets you point to a requirements file specifying the package requirements of the code you’re uploading.
ellf-recipes-sdk >= 0.1.2
pandas >= 2.0.0$ellfpublish
code
./recipes/my_first_recipe--package-version 1.0.0--requirements ./recipes/my_first_recipe/requirments.in
When you publish your recipe, the requirements are installed into the container image that will be used to run the recipe on your cluster. The ellf_recipes_sdk and prodigy packages are always included automatically.
Custom assets
Ellf support defining your own custom asset types – dataclasses that inherit from the built-in Asset – using the @ellf_type decorator. The dataclass can define its own load method, which can then be called in recipes to load the asset data.
Important note on working with paths
If you’re uploading assets to the storage bucket on your cluster, the path your custom asset receives is a cloud path, e.g. s3://your-bucket. This means that you can’t use Python’s pathlib.Path and need to use cloudpathlib.CloudPath (or a similar implementation) instead. You can also use AnyPath, which automatically selects Path or CloudPath based on the input. CloudPath objects follow the same API as Path objects and the cloudpathlib library is installed by the recipes SDK by default.
Here’s an example of a custom asset for JavaScript files that can be used for customizing the annotation UI. The recipe setting takes a string of code, so the asset’s load method will open the file and return its text contents.
from typing import Literal, ClassVar
from cloudpathlib import AnyPath
from ellf_recipes_sdk import ellf_type, Asset

@ellf_type("script", title="JavaScript", description="JavaScript to customize the UI")
class Script(Asset[Literal["script"]]):
    kind: ClassVar[Literal["script"]] = "script"

    def load(self) -> str:
        with AnyPath(self.path).open("r", encoding="utf8") as f:
return f.read()@task_recipe(title="My recipe")
def recipe(javascript: Script):
return {
"config": {"javascript": javascript.load()},
# ...
}Optionally, your custom asset can also use a dict of meta information, which will be available in the dataclass methods as self.meta and can be set via the --meta argument on publish data and assets create.